|
|
WWW.RLYACHTS.NET
|
RL24, RL28, and RL34 Trailable Yachts
from Rob Legg Yachts
|
|
Return to Tips and Modifications Page
A Home Built Furler for RLs - Jay Quinn
Materials Required.
1. 2 * 6metre sections of 15mm high pressure PVC pipe and a short section 25mm PVC pipe
2. 7 * 15mm PVC coupler for each hank. Or as many as you have hanks on headsail and 1 * 25mm connector.
3. 1 * 15 -25mm reducer fitting.
4. 1 * 15mm PVC end caps
5. 2 * 100 mm diameter Caps for reel ends
6. 1 * SS washer to fit tight on Turnbuckle (if boat has two buckles either end, then 2 required.
7. 1 * SS washer to fit swage eye fitting top of front stay to mast connection. If 2 turnbuckles are not used.
8. 4 - 5mm rope. (Total length depends on type of headsail used i.e. Jib/Genoa etc).
9. PVC joining primer, glue and acetone.
10. Aluminum spacers could possibly be used for furler to rotate on, instead of SS washers. This will depend upon the way your front stay is rigged
Measurements and assembly.
1. Stretch out jib/Genoa snugly and measure the distance between each hank from center to center. This is important for a snug fit.
2. Start out with a joiner on end of 6-metre length of PVC. This will be the top of Furler.
3. With the measurements from step 1, cut the next section of PVC to line up with the second hank.
4. At this point you should have a joiner on one end of a section, then another measured length with joiner where next hank measures to, - another pre-measured section - another joiner. The center of each joiner to the center of the next should be the same measurement of the hanks
5. Continue this process until there is a joiner for each hank, and excess PVC at one end.
6. Using the small rasp type of file or small saw. Start in the middle of the PVC coupler and slowly file it down where the measurement of hank is hopefully in the very center of joiner, until a hole develops in the PVC pipe joiner.
7. Continue to file into the pipe to make a hole about 12mm X 5mm in size. This hole has to be just big enough for the hank to fit into the pipe and hook onto front stay wire. Repeat this process until all Hank holes are cut in each joiner.
8. From the top hank of the sail, measure to the end of the sail, or to where the jib halyard would be attached. Add about 100mm to this measurement and cut the top of the PVC to this overall measurement.
9. Measure the diameter of the smooth area of the turnbuckle/ or swaged eye at top of front stay. This is the area below the eye that attaches to shackle and then to mast. You want this to be as close to the smooth area of the eye as possible.
10. Drill a hole that size directly in the center at end of the PVC end cap you will use for top of tube.
At this point you have a long tube of PVC with joiners at various lengths that match up with each hank for your sail. Do not glue anything at this point.
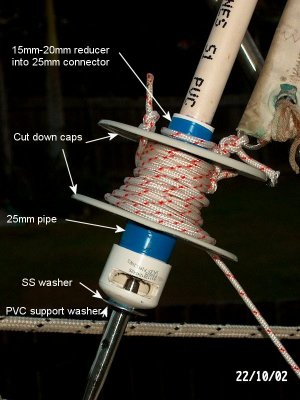
Reel for reefing line
1. Using the two end caps, cut the threaded sections of, so you end up with two flat discs.(feel free to use anything that will do this)
2. Using a hole saw, drill a hole that is a neat fit over 15/25mm reducer on the 15mm end PVC in centre of 1 disc.
3. Sliding this disc up on to the tube fit another joiner to bottom of tube.
4. Fit a small length of 15mm-20mm PVC into other end of joiner, slide second disc up until it sits against joiner shoulder.
Fitting Furler to Front Stay.
1. Now comes the tricky part, you need to have a measurement of total length of front stay. From bottom of swaged top eye or smooth area of top turnbuckle below eye, to the smooth area below threaded eye on bottom turnbuckle. (make sure you have front stay at right adjustment for tension etc)
2. Cut of excess PVC top and bottom above and below last joiners both ends.
3. Now to fit the top cap you have pre-drilled to fit Swaged eye/turnbuckle whichever you have. Slide up to top of front stay if you can. I split my cap and once in place on furler I used a zip clip (plastic tie) around cap to hold tight to furler tube.
Bottom section between the bottom hank and the reel
1. As in step 1 and 2 of the Top end cap assembly, measure from the bottom hank to the end of the sail.
2. Add some excess to this measurement and cut PVC
3. Attach the tube assembly to the spool assembly
Attaching tube and reel assembly to the end cap
1. Using another piece of PVC, attach the end cap (previously drilled for turnbuckle) to the bottom of the reel.
2. Now we have the completed tube and reel with an end cap at each end. The overall length of the assembly must fall within the measurement of the front stay from end to end less the length of turnbuckle to where furler will sit. This gets confusing to describe in words but the front stay will run through the tube assembly and when installed will rotate on the smooth area on top section of the stay turnbuckle. The length of the assembly will have no more than "12-20mm" of play if you slide it up and down.
The space between each of the hanks cannot change. The spaces between the top hank, the cap, the bottom hank, the reel, and the length between the reel and the bottom cap can be adjusted for a proper fit to the stay length.
Only the reel of assembly is glued together at this stage
Trial fitting of the furler to the front stay (Mast is not raised at this stage)
1. Remove the turnbuckle from the bottom end of the stay. This will leave only the threaded fitting attached to stay. Suggest marking the adjustment before disassembly. This will make it easy to re-adjust once all is fitted up.
2. Slide on the aluminum spacer first if you are using one, followed by the SS washer, this is for top of stay at swaged fitting or turnbuckle (whichever you have). These parts do two things. Protect exposed threads on the stay, and acts as a bushing for the end cap to spin against.
3. Now slide the entire assembly on to the stay until it butts up against the top fittings.
4. Guide the stay through the end cap at the bottom. (this cap should not be glued at this stage)
5. Slide on the last SS washer and then the last spacer (If you are using one).
6. Replace the turnbuckle to the end of the stay to the same place it was prior to this step.
7. If everything is the right size the entire assembly is on the stay, with just a small amount of play from end to end. 12-20mm when stay pulled tight.
8. Too loose? - Increase the length of the assembly by one of the methods listed above.
9. Too tight? - Reduce the length of the assembly by cutting the PVC at the section below the reel.
10. When assembly spins freely on the stay with a small amount of end to end play, Remove and Glue it all together.
Please take Note- when gluing PVC together, be sure to push firmly together until the glue sets (5 seconds), or the parts will not seat together and affect your measurements.
11. Rotate the assembly on a flat surface so that the hank holes are facing away from you.
12. Looking at the top cap, drill a hole through the cap above the halfway point on the same side the hanks are cut. This hole to size for Headsail halyard.
13. At the bottom of the assembly and the top of the reel. Drill a hole oriented the same way as the top.
14. Run a 3-5mm line through the holes, to later be attached to the sail.
15. Drill a hole in one of the reel ends for the roller reefing line. If you want to be able to use a clip on furler line to disconnect it when trailering, hole needs to be towards outside edge to enable clip to be inserted.
16. Install assembly back on the Front stay.
17. Clean up assembly by lightly sanding or using acetone to get the "finish" you like.
Installing the Sail
1. Re-attach the assembly on the stay and ensure everything fits properly.
2. At each of the couplers on Furler tube you will see the wire of the stay through the hole in the coupler.
3. Insert the hanks into the opening and around the stay, as you would normally do with hanked headsail.
4. Continue until all hanks are secure and the two ends of the sail are free. Each end of the sail should not go beyond the top cap or the top of reel.
5. With the line at the top cap and the top of the spool. Attach the ends of the sail and tighten the sail to your preference.
Now you should be able to roll the sail up with very little effort, it may possibly be bit notchy at this stage, when rolling up.
This will disappear once the mast is in place and stay is tensioned, as well as once it has been worked a few times. It is beneficial to apply some silicon spray to the load-bearing surface at base of furler from time to time. This certainly reduces the friction and wear on PVC end cap.
Now the test.
Time to test it all by raising the mast. The first thing you will notice is the extra weight of mast with Headsail and furler attached.
Once the mast is raised, attach the front stay, as you would normally do. This can be a bit of a fiddle to do the first few times. Once this has been completed. Check that you have some definite play in furler by lifting it up and down.
Attach rope to Furler reel, the length of this rope can be worked out later. As long as you have the rope longer than needed and not shorter you will be fine.
Attach the Headsail sheets, wrap them 2 or 3 turns around the furled headsail anticlockwise. Now holding a slight tension on furler line, pull on one of the sheets. The Furler line should spool onto the reel as the sail comes of Furler. Once sail is fully extended. The Furler line can be cut to length. Select a position in or near cockpit for a cleat of preference to use as the tie off point for Furler line.
All Done.
Now for the shakedown run on the water.
To set sail at any point the Furler line is cleated off. This holds Furler at the selected position and Headsail can be adjusted for point of sail.
To Furl Headsail. Release sheets and pull on Furler line.
You will find it far easier to furl if you fully release sheets and allow sail to Luff as if you were head to wind. This takes all the wind pressure off sail and is not so hard on the hands to pull line in.
All being well. Your Furler should work quite well.
May not be as free and as good looking as a professionally manufactured one, but for a few dollars and a bit of your time it will do what it is supposed to do.
So far I have used it in many varied strengths of wind, even to 35 knots with a Genoa Furled to size of a small working Jib. With no problems. Originally had the standard RL headsail on it. Have now replaced it with a Genoa that comes back to end of Cabin at the cockpit. Standard Headsail changed to use free flying if needed, so far it has not left it's sail bag as the Genoa has been more than successful in all the conditions, at all furled points to date.
It has totally changed my single-handed sailing for the better and when family sailing, it is so easy to use, anyone can furl it away. It is great for anchoring up. Can pull down main as approaching the anchorage and sail into anchorage area under Genoa only and Furl it as anchor is dropped. No more mad speed to get everything down, start motor and power in to position.
| 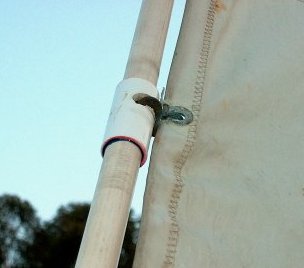 Hank Slot
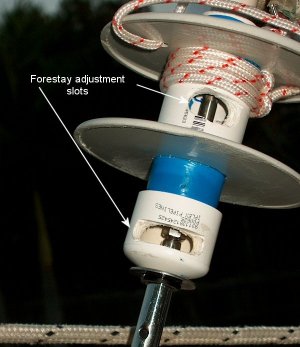 Drum with Adjustment Slots
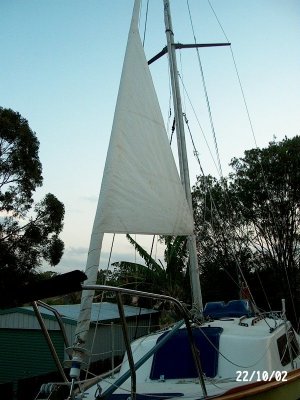 Semi Furled
|
Jay Quinn
|
|